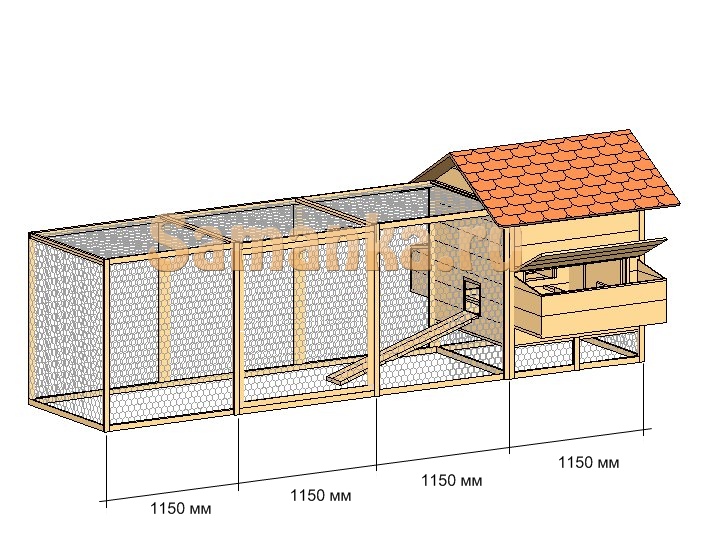

Rear of coop and run. Will be adding chicken wire to the top. The post on top are chain link fence rails that were recycled. The fence post are damaged treated landscape timbers that were given to me. I had planned to use a recycled chain link fence but since I got the landscape timbers for free I went ahead and got 1x2 welded wire for the run area. I also use 3' wide 1/2" weld wire along the bottom. I put it 1 foot up on the fence and burried the other 2' feet turned out from the fence to keep preadators from digging under.

Recycled Chain Link Fence Gate to enter run.

Doors for nest and roost area.

Nest access doors for gathering eggs.

Nest boxes on the inside.

Door to access area beneath the roost for cleaning.

Placed sand under the roost for easier cleaning (hopefuly).

They are trying out the new roost.
The building it 8' x 12' and the run is 20' x 20'. Based on 4sqft per chicken I should have room for 24. I have lost some floor space due to the roost layout so I was wondering do you count the roost space in the 4sqft or is 4sqft of floor space?
Here is our coop, we still have to paint and put on roofing paper and shingles but our chickens love their home nonetheless  .
.
 .
.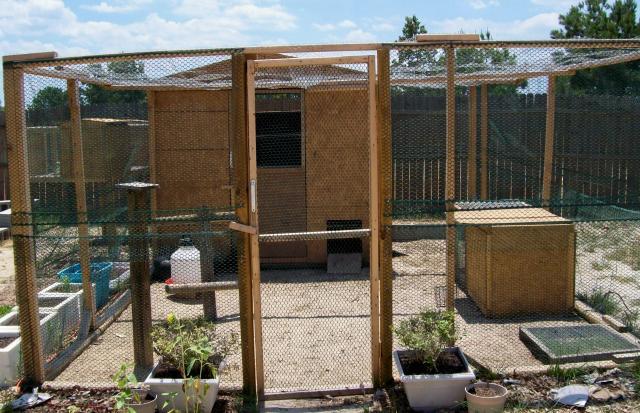
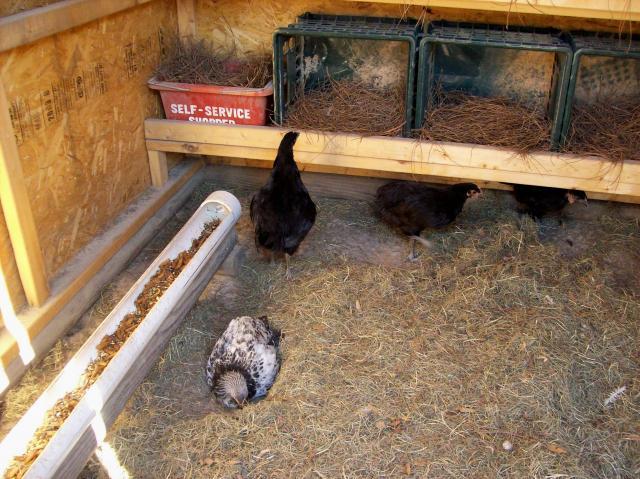
Let's take a peeksie inside....
We've
added a tri-level roost in one corner. It's really cool, it is quite
easy to get onto the first and second level but roosting on the top
level requires a little size in order to make the flight up there. So
far it is the favorite place of 3 hens-partridge rock, americauna (ee),
and dark cornish. As you can see in the picture there are two doors the
flock can enter and exit the coop from.

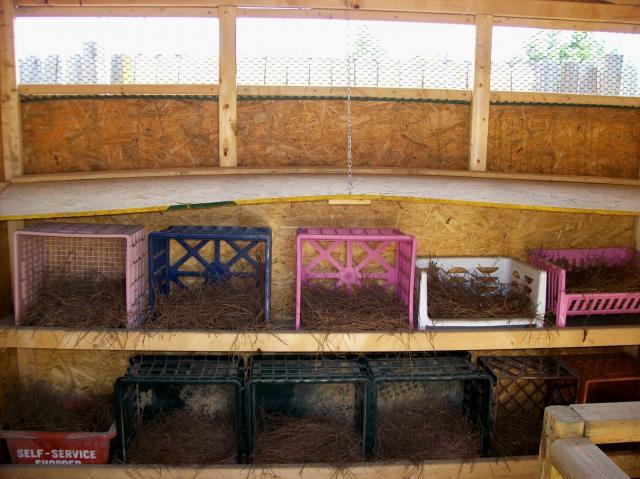
For
nesting boxes we went with "given a new purpose in life" milk crates
and various plastic bins. Handy hubby made two shelves for them to sit
on and also a slanted top that can be adjusted. The top keeps them from
roosting in the top level of nesting boxes and it is on a slant to help
keep them from roosting on the top itself! There are also 3 windows
above the nesting boxes for ventilation. We are adding a hinged door to
the outside of the windows so we can close them in really cold weather
during the winter.
Now let's check out the coop yard  . One
of the main things I like about the yard is the broody box we added. We
still have to paint it and add shingles to the hinged top. Right now it
is home to about 18-four week old chicks. It's neat having them in the
same yard as our older chickens yet separated so no one gets hurt.They
can see each other. Once they are bigger we will combine the flocks.
Back at the ranch - this is going to make a great broody box.
 . One
of the main things I like about the yard is the broody box we added. We
still have to paint it and add shingles to the hinged top. Right now it
is home to about 18-four week old chicks. It's neat having them in the
same yard as our older chickens yet separated so no one gets hurt.They
can see each other. Once they are bigger we will combine the flocks.
Back at the ranch - this is going to make a great broody box.
I
also like that there are is a bunch of things to keep the chickens
occupied while they are in the yard. We added quite a few yard
enhancements starting with outdoor roosts.
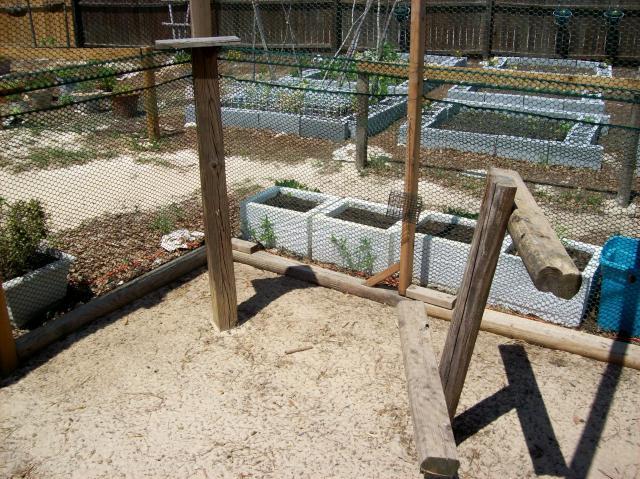
We
used a "given a new purpose in life" tire to provide a dust bath area
for the flock. They really love this and use it ALOT. It was mid-day
when I took these pictures so they are all in the coop where it is
cooler but come evening some will be in the dust bath.

On
the side of the coop, in the back of the yard we used cinder blocks to
section off a small area to use as a compost bin for them. I put grass
cuttings, veggie scraps, seeds, anything safe for them to eat in it. It
is fun watching them scratch around in there and finding treats.

Hubby
put some wood together along with some hardware cloth and made a
bottomless box. I put it in one corner of the yard and grew grass under
it. They cannot pull the grass out by the root or scratch it up and as
it grows it comes through the hardware cloth top and they can nibble on
the growing tips!

This
idea I found online in my travels and thought it was such a great way
to add another enhancement to the yard. We hung two suet cages in the
yard and we put veggies in them when we have extra available.

We
thought by adding a solar light in the run it would attract bugs and
give our chickens a late evening snack. Well, if the bugs come it must
be after the chickens are already sleeping because I haven't seen it
attract any bugs. I kept it in the yard though because I really like the
effect it gives at night. Really cute look.

As
I said earlier, we still want to paint and add shingles. Choosing the
colors will be lots of fun. We are also going to add that hinged door to
the outside of the back windows. I'll post updates as they happen!
Thanks for visiting my page here on BYC  .
.
 .
.
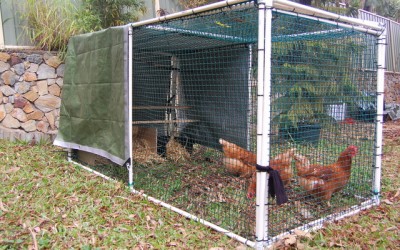
Here is a step by step guide of how to build the basic structure for a simple chicken 'tractor'.
Tractor as opposed to Chicken Coop because you can drag it around your yard for the chickens to weed, feed and toil your garden beds for you, so you don't have to do all the work. It is super lightweight to move so there is no need for wheels.
This is such an easy design you are more than capable to put it together all by yourself.
This basic design is 1 metre wide X 1 metre high X 2 metres long and best suited for 2 - 4 chickens. If you want more chickens or a larger structure you can adjust it to be as big or as small as you like! Just simply add an extension.
Contents
- Shopping List
- Important Notes
- 10 Steps to Build a Chicken Tractor
- Buying and Feeding Chickens
For example, some plumbing supply shops can supply the PVC plastic joins for around $40 cheaper.
It's up to you. To make it easier we have created this list from Bunnings so you can easily shop from left to right of the store, leaving the garden trellis mesh until last. It's the biggest item to carry to the checkout on your trolley.
Shopping List
| Section/ Isle | Description | Price | Quantity |
| These first two items are optional | |||
| Tool shop- 8 | General Purpose Scissors 210 mm (F/L 6010285) | $8.97 | 1 |
| Tool shop- 8 | Hacksaw Box Frame (F/L 5710077) | $8.95 | 1 |
| Must haves items | |||
| Tool shop-11 | Disposable Mask (5823445) | $3.50 | 1 |
| Cleaning-40 | Rubber Gloves (9310124170420) | $2.33 | 1 |
| Plumbing - 44 | Cement Solvent Pressure Pipe 250ML Type P Green (9318858104179) | $8.97 | 1 |
| Plumbing - 44 | Press-PVC Elbow 90Deg PVE15 15mm (9319841036385) | $1.47 | 28 |
| Plumbing - 44 | Press-PVC Tees Plan PVT15 15mm Tee (9319841037672) | $1.99 | 6 |
| Plumbing - 45 | PVC Pressure Pipe Holman 15mm 1 metre class 18 PVP1518-1 (9319841030413) | $2.34 | 38 |
| Indoor Timber - 48 | Pine planks 90 x19x1.2 (9316504024154) | $3.12 | 2 |
| Electrical- Back wall | Cable Ties Management 300 x 4.8mm Pack 100 (9337103485290) | $11.90 | 3 |
| Lifestyle-20 | Pegs Poly Irrigation Riser Heavy Duty Pins Pk 10 (9312261143152) | $3.10 | 1 |
| Lifestyle-21 | Tarpaulin Heavy Duty 2.4 x3 m (9335700590287) | $19.95 | 1 |
| Lifestyle-21 | Trellis Plastic Gardenmaster 1200mm X 3 Metres Green (9312620400445) | $23.44 | 3 |
Important Notes
Plastic Garden Trellis: This is NOT fox proof but is easier to use and costs less than chicken wire. If you need fox proof please use chicken wire. It is expensive to buy new so try and get some second hand from your local tip shop or free from the Freecycle group in your area.PVC Joinery: Please make sure that when you buy the elbow joins and the tee joins that they do NOT have thread inside like a screw on. They need to be smooth inside like this one:

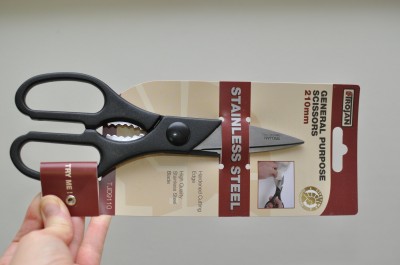
Scissors. It is important you use a sharp pair of scissors suitable for the job. Here is a pair of scissors which are most suitable for the job. These scissors are on your Bunnings shopping list.
10 Steps to Build
STEP 1. Making the End Frames with Doors.
In this step you are going to make both ends of the chicken tractor including square door frames that will fit neatly inside the outer frame like this:
The smaller inner square will become an entry door from either end to collect eggs from one end and change water or feed at the other.
Make the smaller inner door frames first. Take 8 of the 1 metre long PVC polypipes. Measure them to be exactly 94 cms long (or mark 6 cms (60mm) off the end). The base of the PVC tee join is exactly 6 cms so you can use this as a measuring guide if you want to save some time.

Use a hacksaw to cut each one individually. If you have never used a hack saw before here is a link to a video which shows you how to use a hacksaw. http://www.youtube.com/watch?v=wkPA3Pwjbpc
After you have cut your 8 pieces of PVC polypipe you will notice that the ends are really jagged.

Use a piece of fine sandpaper, abrasive sponge or roll/rub the end of the pipe on concrete to smooth the burrs off.
You now have 8 pieces of PVC polypipe that are 60mm short of 1 metre or 96cm long.
Using 8 elbow joins (4 for each square)
and lay out them as two squares. IMPORTANT. DO NOT TRY TO GLUE THEM
TOGETHER YET or your tractor will end up looking like The Ettamogah Pub.
At the moment, you are just pressing all the elbow joins and the 94 cm
lengths of pipe together to form two squares. (NO GLUE!) It is a bit
like putting lego together!

Now put this square aside, you have one more of these to make. Go for it.
Next you need to make the two larger squares that will become your door frame.
You will need 8 x 1 metre pieces of PVC polypipe and 8 elbows. Then put them all together, till you have 2 large squares. Do not glue them yet!
STEP 2. Making the Side and Top Frames
Lay out 7 x 1m PVC polypipe with 4 x elbow joins and 2 x tee joins to form this pattern.

Put together another 2 frames just like this until you have 3 in total. You now have your frames for both sides and the top.
STEP 3. Glueing

It is really
important that you construct all sides of the chicken tractor before you
glue them together. I repeat, assemble all the frames before you go
anywhere near the glue.
The glue is smelly
and messy. When the label on the glue container says you should only use
it in a well ventilated area, they mean it. The stuff stinks!! Be
careful. Wear gloves and work in a ventilated area. There is a brush
included with the lid of the glue but I preferred to use one of the
kiddies old small paintbrush.
Naomi glued her frame
together outside on flat cement, Fiona used her old ugly flat fibro
verandah. The glue sets within seconds and must be handled with care.
Have a towel handy to wipe up spills immediately.To keep the mess contained move a piece of cardboard under each joint as you go. If you spill this glue on the floor and it sets it will not come off again.
You will need to
concentrate while gluing. Do not do it with small children around. Most
of the other steps can be done with little ones helping, but not this
one. Industrial glue and small children should not be mixed.
This glue is very
strong and sets within seconds. This means you must make sure all the
assemblies are lying flat on the ground because if you glue it together
and the elbow join is pointing the wrong way at the other end you are
not going to get it unstuck. Keep each panel laying flat while you glue.
Apply liberally and coat the inside of all joins as well as the end of
the pipe before pushing the PVC polypipe into place. If you coat only
one end of the pipe and not the inside of the join, or put the glue on
too thinly, you risk having your structure come apart.

STEP 4. Attaching the Plastic Mesh
After you have glued everything together and cleaned up the mess the next step is to attach the plastic mesh to your frames. If you can, do this on your kitchen table to protect your back.
Take a side panel and lay it flat. Roll out the mesh across the panel and attach securely with cable ties. Work down one side and bottom panel first. Continue to secure with cable ties every 6 - 8 squares along the mesh.

On one side you will see there is some excess mesh.

Now you need to trim off the excess with your scissors. You need to cut slightly inside the frame.
 You also need to cut the mesh close to the join. Otherwise, you will
end up sharp edges which will catch on things. Here is a photo of the
right and wrong way to cut the mesh.
Here is a photo of what your frame will look like after you have cut the mesh and before you have attached the final sides with cable ties.

The gap between the mesh and the frame will close as you tighten the cable ties.

One you have cable tied the entire frame, trim off the excess bits with you scissors and then move on to the next frame. You need to do this your three largest rectangular frames and the two smaller square frames. Do not attach mesh to your two larger square frames.
You should now have:

3 of these

2 of these

2 of these
STEP 5. Putting the Frame together
Lay one side panel flat on the ground.
Attach one large end panel (without mesh) to one end standing upgright.

Secure with cable ties spaced approximately every 6 mesh squares along.

Take another side panel and attach along the bottom and also secure to the end panel.

Secure with cable ties at all corners and every 6 mesh squares along.


Be sure to secure with cable ties on either side of all joins.

Continue to add the other end frame. As well as the other side.
Once all sides are secure roll the structure over to the right way with the roof on top.

STEP 6. Putting the doors on
Remember the doors are going to fit inside the end frames like this.

Use 7 cable ties to secure one side of the door inside the end frame.

Be sure to thread a cable tie through the corner piece at the top of the door. Secure firmly.

You should now be able to swing your door open and shut.

Repeat for the other end and cut off the ends of the cable ties that are still sticking out.
STEP 7. Adding a Roost
Chickens like to roost up higher at night.
Using your 1.2 metre long pine planks decide where you want your roost to go. I used 2 planks to create a step.

Make sure the planks are low enough for the hens to get up on yet high enough to clear your nesting boxes and allow easy access for egg collection.
Make a cut in the plastic garden mesh to secure your plank through.

Or if you have a stick that is long enough and large enough for the chickens to roost on you can add that as well.

Step 8. Putting the Tarp on
Drap the tarp over half of the enclosure and secure with cable ties using the handy eyelets already manufactured in the tarp.

Cut the tarp so that you have no excess overhang (or not if you prefer). You can see in the picture below I've made two cuts down each side so that I am left with a neat back panel.
Secure the back flap with bricks. When you want to collect your eggs, just flip the back up and open the back door. Easy!

STEP 9. Nesting Boxes
The best way to save money on a nesting box is use something you already have or get creative! It does, of course have to be a suitable size for the Chicken to be able to lay in, and then they will be more than happy to use the Laying Box you provide.
You could try an old wooden crate for a nesting box, a old washing up basket (fully enclosed) which are easy to clean or basically anything that a chicken can get easy access to to lay an egg.
Here are the ideas that I am trying. The first is a two tier bookshelf I bought for $16.00 from Crazy Clarks. I built it without one side and left it open for the chickens to gain access.

The other idea I like even better are these cheap but sturdy plastic containers. Also from Crazy Clarks they cost me $6.00 each. I used a hacksaw to make an opening. The reason why I like these is I can clean them more easily than wood.

STEP 10. FINAL STEP! Securing the Tractor
This tractor is super lightweight. So you don't want it blowing around in a strong wind. Secure the tractor easily with these hook type steel pegs - a bit like pitching a tent! They can be easily removed and secured as you move your tractor around the yard.

Secure the doors with old pantyhose.

Buying and Feeding Chickens
Breeds
The easiest, friendliest, most productive type of chicken you can buy is an Isa Brown or Lowman Brown as they are sometimes called. Here is a video of Isa Brown chickens.You can buy these chickens from a local produce store. Go to www.yellowpages.com.au in Australia and http://yellow.co.nz in New Zealand and search for a local produce store near you. Ring them first to check that they sell Point of Lay chickens.
Point of Lay chickens are already laying or ready to lay very soon. Much better than the cute, fluffy day old chicks. That way you know you won't be left with a rooster which needs to be gotten rid of.
One point of lay chicken will usually cost around $17.50 in Australia.
Feed
For point of lay chickens they are usually fed Laying Mash. It is a specially formulated chicken feed , higher in protein and various minerals including calcium suited to the nutritional needs of hens producing eggs. The mash is ground finer than normal feed and can be fed dry or moist. It also comes in pellet form.By sure to put the feed in a sealed container or the rats will move in.
Chickens love to eat your veggie scraps from the kitchen but be a little selective. Avoid giving them meat, avocados, green peppers, onions and garlic.
Water
Chickens need to have access to water at all times. We recommend finding the largest sized metal container you can get. You don't want your chickens to ever run out of water.Rules and Regulations
On a property less than 800m2, you are allowed to keep 6 chickens, ducks or geese without a permit. If your land is greater than 800m2, then you can keep up to 20 fowl. Your hens are able to free range but a cage is recommended for the birds' safety from predators at night.There are different rules for different Councils. Check the regulations for keeping backyard poultry with your local Council.
The First Egg

This is Naomi's first egg. She bought her chickens on a Thursday and they gave their first egg on the Friday.
Bedding/nesting room:

This is the old nest box that I moved in here. The roof slopes too much and I don't want to hit my head getting eggs. It is in the middle of the room. Is that going to be ok?

If you are 3/4 of the way down and looking back toward the nesting room:

The wire will be reinforced with 2x6s at the base, sandwiching the wire so it can not be lifted by a larger nose.

Because of these reinforcing units, I ran the wire on the inside of the posts:

But I extended it all the way through the joists to the metal roof. You might see some bent over nails instead of staples. I have a case of nails. And I did not want to buy staples. They are spaced about every 8"

This is a close-up of where the chickens will enter the nesting area. I had a horse once. I think he did this, but he was a bit of a drunk.

This is where the previous Don Quixote of Chicken Farming had his entrance to his coop. It was just this one room. I am going to try and re-use the gate. Not sure, yet, how I am going to secure it against coons, but, I'll think of something.

Compare this to the above picture. this is just down and left of the image. This is what I was talking about with the dig-protection. It will be secured with wire and nails as well. This is the old wire from the previous coop. Rusty, and weak, but strong enough to stop a paw.

There are a few more places I need to work on to keep varmints out, get watering to be automatic, along with feed.
But, here's the best part. The wire was given to me by a buddy (Locksmith76) who lives nearby. Fuggit donated some materials (but haven't used them yet).
EDIT TO ADD PIC:

This is the 'old' hog pen that I used when I had Pickles. I have not torn it down, yet, because I keep thinking that there might be a way to incorporate it in to the new pen?
Ideas on that? Or just pull it down?
Everything was simply leftovers, gimmes, or re-used.
No money spent (so far)
TRG
Found a yard gate still in place, with hinges. At first I just wanted the hinges, but carried it back to see if it would work better. It did. A few minutes with a drill, a wrence and I had a new gate. Perfect fit, if I do say so myself:

I still had some gap at the top, but not very much. I added some more wire and cut some of the ends to be spikes to help deter a fat coon or possum from exploring the area too much.

I needed a way to close it and keep a coon or possum from wedging themselves through the gate gap. This show the 'give' in the gate with me pulling on it when I snapped the pic. I am not 100% pleased with the locking method, because human error might mean the chain was too loose.

I finished the dig barrier using the old chicken wire, doubled back on to itself and then wired and nailed in place. I found my electric fence tester, gate handles, but cannot locate the actual charger. Maybe the ex-wife took it withe her? I dunno.

I banged the sheet metal back out, and then cut an opening for the chickens. I need to dress up the opening, because there are sharp edges. I'll use some small pieces of scrap to frame in and sandwich the edges later.

Also added a walkway, and you cane see the outer wire in this pic for some perspective. Since it is a fully enclosed perimeter, I guess I won't need a door, but I put the entrance in this corner so I can add a closing mechanism later if needed that I can operate from outside the cage.

Now, it is water supply (thanks for the regulator idea, btw Feral) and then feed.
At some point I might even get some chickens.
TRG
Talked to my dad about the coop, he told me that I needed to make a roost. So... pics:

You'll also note that I moved the nesting boxes.

Amish Chicken Coop Video Tour
I made a video of the inside and outside of our Amish Chicken
Coop to better show its features. I love this coop; it’s the best we’ve
ever had. No predator has ever been able to break in, the hens all stay
warm and dry at night, and they actually use their nesting boxes. Happy
chickens make for a happy backyard flock mama!

Close up of the nesting boxes, seen from the outside. Simply lifting the lid reveals the inside of the boxes — and hopefully, many warm, fresh eggs:

The lid over the nesting boxes is just heavy enough that the little ones can’t open it without assistance — which is good, since it’s on the outside of the pen and the hens might hop out if it’s left open long enough.
Here is the view from the back of the chicken coop and scratch yard:
Oops, looks like one of the kids got into the picture — that’s Patrick, my fun-loving 5-year-old. We’d just cleaned out the coop and put in fresh litter (pine shavings) and he decided to jump in there and check it out.
Here’s what a clean coop looks like on the inside:
 We had not
 yet installed the extra roosting bars you see in the video, when this picture was taken.
Oh, and the best plans I’ve found for those wishing to build a similar coop are these saltbox-style coop plans on eBay. See photo —->
Video of an Amish Chicken Coop
Backyard Chicken Coop Pictures
The front exterior view of our Amish chicken coop, in the afternoon as the setting sun warms the front:
Close up of the nesting boxes, seen from the outside. Simply lifting the lid reveals the inside of the boxes — and hopefully, many warm, fresh eggs:

The lid over the nesting boxes is just heavy enough that the little ones can’t open it without assistance — which is good, since it’s on the outside of the pen and the hens might hop out if it’s left open long enough.
Here
 is the view from the back of the chicken coop and scratch yard:
Oops, looks like one of the kids got into the picture — that’s Patrick, my fun-loving 5-year-old. We’d just cleaned out the coop and put in fresh litter (pine shavings) and he decided to jump in there and check it out.
Here’s what a clean coop looks like on the inside:
 We had not
 yet installed the extra roosting bars you see in the video, when this picture was taken.
Oh, and the best plans I’ve found for those wishing to build a similar coop are these saltbox-style coop plans on eBay.
So there you have it — a video and photo
tour of our backyard chicken coop — I’d love to see pictures of your
coop, please leave a comment below!
This entry was posted in Backyard Chickens, Chicken Coops and tagged Amish Chicken coop, Chicken coop video. Bookmark the permalink.
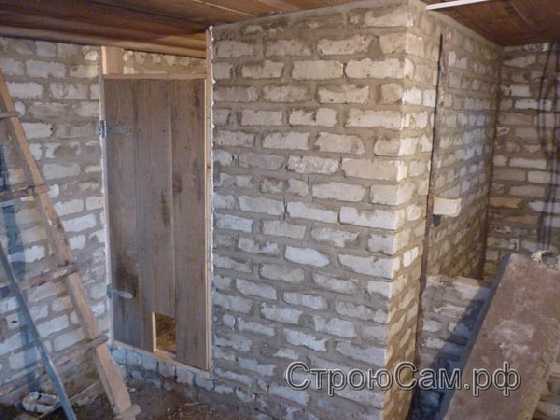
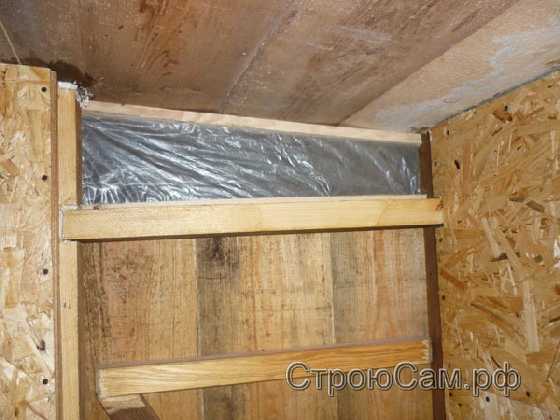
Итак, в готовом сарае я оделил угол выложив стену из того же селикатного кирпача. В результате получился курятник размером примерно 1,4х1,7 метра. Обратите внимание, что делать окно в стене я не стал, а облегчил себе задачу и оставил место под окно над дверь.
В двери сделал выпил, чтобы куры могли выходить днем в большое помещение.
Внутри курятника, на этом этапе, были только голые, неоштукатуренные стены. Собственно их и не надо штукатурить. На стены я прибил обрешетку используя обрезки бруса сечением 50х50мм.
После этого между обрешеткой был вложен пеноплатс толщиной 50мм.
Для резки пенопласта был использован монтажный нож. Желательно, чтобы не было больших зазоров между обрешеткой и пенопластом. Большие щели имеет смысл запенить монтажной пеной.
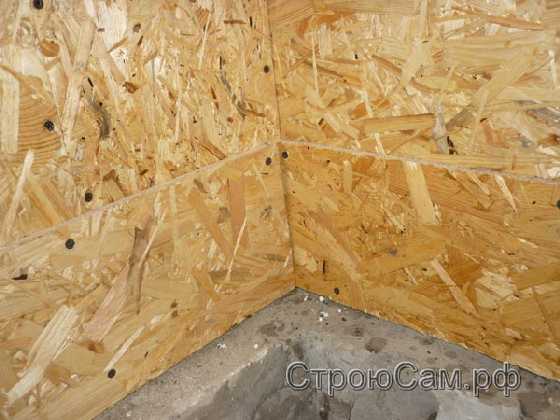
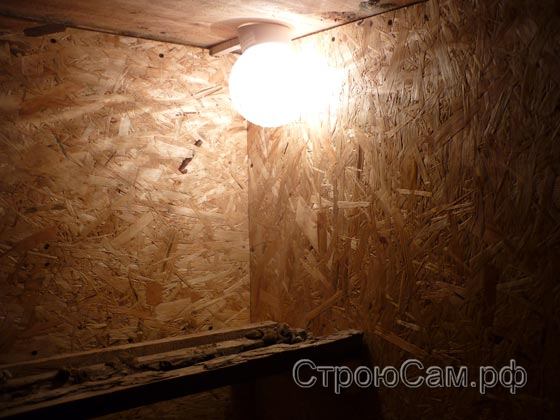
После того, как был уложени пенопласт, я прикрутил к обрещетке OSB. Обратите внимание, что узкие полосы ОСБ я прикрутил вдоль фунтамента, предоложив, чтобы в дальнейшем, не повредить облицвку во время чистки курятника.
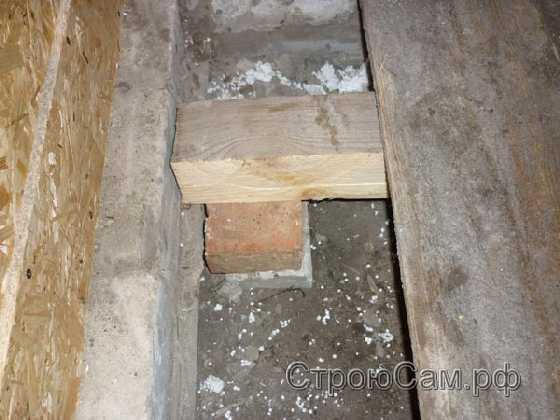
После того, как были готовы стены, я приступил к изготовлению полов. Полы у курятнике должны быть деревянными, а не земляными или бетонными. В наличии была доска только толщиной 25 мм, поэтому я положил три лаги (чтобы полы не прогибались под тяжестью человека).
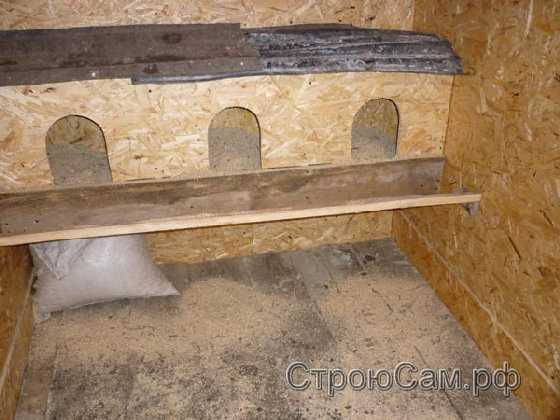
Гнезда я слелал все из того же ОСБ использовав во время работы электрический лобзик.
Сверху положил два листа резинового шифира, перед гнездами закрепил жердочку. Также сделал жердочку справа, ближе к потолку.
В качестве источника света и тепла использовал лампочку на 60 Вт закрытую плафоном (цена порядка 50-60 рублей).
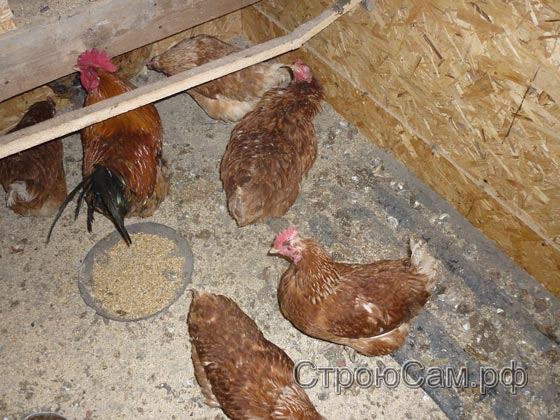
На момент написания статьи на улице мороз под 30 градусов, но пернатые исправно несутся.
Вывод: в данном курятнике не только можно жить, но и размножаться
Всем удачи!


